
My New Time Attack Car Build Thread

Thread Starter
-DMD-
Joined: Oct 2005
Posts: 2,526
Likes: 0
From: Chesapeake


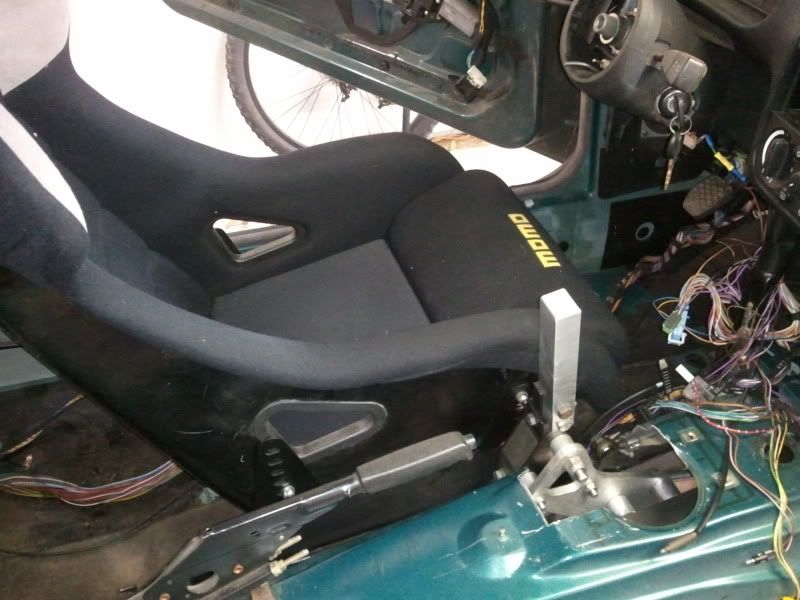
Spent most of the day preparing the garage and moving the other cars around. Here's a pic of the long shifter, definitely not for babies. The springs are so fuggin tight it's redonkulous.

Racetracks
Joined: Nov 2002
Posts: 15,668
Likes: 0
From: How long is a piece of string?
An update for anyone following the strain gauge ignition cut storyline: It was decided to scrap the idea. I completely failed to realize that it was an H-pattern transmission instead of a sequential. Oops. 
Thread Starter
-DMD-
Joined: Oct 2005
Posts: 2,526
Likes: 0
From: Chesapeake
 But then again I wouldn't enjoy the maintenance that comes with them.
Thread Starter
-DMD-
Joined: Oct 2005
Posts: 2,526
Likes: 0
From: Chesapeake
Sorry these are small updates but i'm just gonna try and keep updating this thread as often as possible.
Titanium Alloy Bellhousing

Finished Engine Side Engine Mounts - The downtubes to the chassis are next.

Did a little painting in the bay. It turned out pretty good. I used a Cynoacrylate based paint for the base coat and acrylic enamel for the top coat. FWIW Cynoacrylate is the active ingredient in super glue. It's POR flexcoat i'm sure some of you are familiar with it, super hard stuff!

Not sure if i'm going to stitch the seams or not. I'm most likely going to leave them and tie the strut towers into the cage. Haven't decided yet. This is what i'm thinking though.

Titanium Alloy Bellhousing
Finished Engine Side Engine Mounts - The downtubes to the chassis are next.
Did a little painting in the bay. It turned out pretty good. I used a Cynoacrylate based paint for the base coat and acrylic enamel for the top coat. FWIW Cynoacrylate is the active ingredient in super glue. It's POR flexcoat i'm sure some of you are familiar with it, super hard stuff!
Not sure if i'm going to stitch the seams or not. I'm most likely going to leave them and tie the strut towers into the cage. Haven't decided yet. This is what i'm thinking though.
Last edited by DRFTwizard; Nov 10, 2010 at 04:49 PM.
Thread Starter
-DMD-
Joined: Oct 2005
Posts: 2,526
Likes: 0
From: Chesapeake
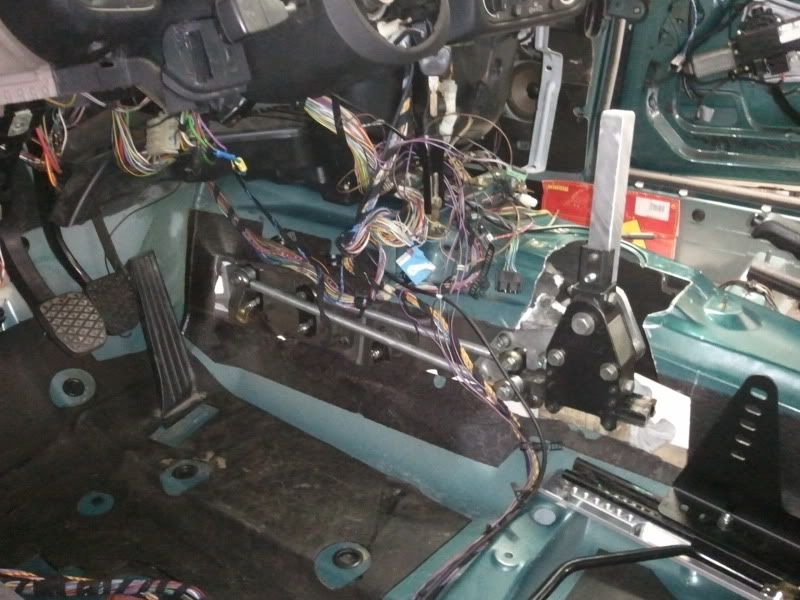
So it's been awhile since I've updated this. As some of you may know, I drove in the Rolex 24 at Daytona this year with Bennett Racing the team I co-founded with a good friend of mine Skip Bennett. That tied up every last bit of my spare time for most of the last year and a half, now that the race is over and things have settled down some, I'm focusing most of my attention to this project. Lots of things are in the works right now, the engine should hopefully be done in the next week or two. I built the bottom end and had a good friend of mine "BC" finish putting it together as he is going to port my heads and do some other things to help me out. While the engine is being assembled I wanted to test fit the tranny using the spare block I have. So I read on another forum that a guy was using a Jerico and ran into some major clearance issues with the external shifter. This was a little scary because my Tex Racing trans is also externally shifted. So Saturday morning I decided to go ahead and take care of this issue.
Step 1

Then I immediately got the full scope of how much room I needed to make this thing fit.

I made my first cut to get the shifter mount up through the tunnel so I could get the engine and tranny at the correct angle of declination of 2.0 degrees.


So its a little tough to see in the above pictures from inside the tunnel but the shifter assembly has to mount to the left side of that aluminum bracket. So the clearance issue is pretty obvious.

Everything sitting at 2 degrees

The cutting to clearance the rods started early this morning. I know it looks scary but I'm going to make a removable cover/structure that will encase everything. I want is easy to remove so I can service the linkage if I need to. It will also make it easier to get to the grease fitting on the tailshaft.

I was really worried about where the shifter was going to end up and if I was going to make a crazy shift lever in order to make it functional but I actually and really really happy with where it ended up. I made a temporary lever just to get an idea of what it was going to be like and I'm stoked. I'm probably going to make a pretty tall lever to get the knob within 6in of the steering wheel. More to come this week.

Step 1
Then I immediately got the full scope of how much room I needed to make this thing fit.
I made my first cut to get the shifter mount up through the tunnel so I could get the engine and tranny at the correct angle of declination of 2.0 degrees.
So its a little tough to see in the above pictures from inside the tunnel but the shifter assembly has to mount to the left side of that aluminum bracket. So the clearance issue is pretty obvious.
Everything sitting at 2 degrees
The cutting to clearance the rods started early this morning. I know it looks scary but I'm going to make a removable cover/structure that will encase everything. I want is easy to remove so I can service the linkage if I need to. It will also make it easier to get to the grease fitting on the tailshaft.
I was really worried about where the shifter was going to end up and if I was going to make a crazy shift lever in order to make it functional but I actually and really really happy with where it ended up. I made a temporary lever just to get an idea of what it was going to be like and I'm stoked. I'm probably going to make a pretty tall lever to get the knob within 6in of the steering wheel. More to come this week.
Last edited by DRFTwizard; Feb 4, 2012 at 10:01 PM.